Freelance invoice guide + free templates for Canada
Learn how to create a freelance invoice that gets you paid faster, with free templates and Canadian tax tips.
Written by Lena Hanna—Trusted CPA Guidance on Accounting and Tax. Read Lena's full bio
Published Tuesday 19 May 2026
Table of contents
Key takeaways
- A freelance invoice is a formal payment request that lists services provided, amounts owed, and payment terms. Including the right details, like your GST/HST number if you earn over $30,000, helps you stay compliant with Canadian tax rules.
- Professional invoices build trust with clients, speed up payment, and create a paper trail the Canada Revenue Agency (CRA) expects you to keep for at least six years.
- The average Canadian invoice takes roughly 30 days to get paid, but offering online payment options can cut that wait time in half.
- Tailoring your invoice to your billing type, whether it's project-based, hourly, or retainer, reduces confusion and disputes so you can focus on the work itself.
What is a freelance invoice?
A freelance invoice is a document you send to a client requesting payment for services you've completed. It acts as both a formal payment request and a legal record of the transaction between you and your client.
Unlike employees who receive automatic paycheques, freelancers are responsible for billing clients directly. Your invoice outlines what you did, how much it costs, and when payment is due. It's the bridge between finishing the work and getting paid for it.
A well-structured invoice also serves as a key financial record. In Canada, the CRA requires you to keep supporting documents for your income and expenses for six years. Your invoices are a central part of that record. For a deeper look at what invoices do and why they matter, check out this guide to invoices.
Why freelancers need professional invoices
Sending a polished, detailed invoice isn't just a formality; it directly affects how quickly and reliably you get paid. A professional invoice signals that you run a credible operation and sets clear expectations for your client.
Here's why it matters:
- Faster payments: clients are more likely to pay on time when the amount, due date, and payment instructions are crystal clear
- Fewer disputes: itemized descriptions of your work reduce back-and-forth questions about what's being billed
- Tax compliance: if your revenue exceeds $30,000 over four consecutive quarters, you're required to register for and charge GST/HST. Professional invoices make it straightforward to track and remit those taxes
- Legal protection: a detailed invoice creates a written record of agreed-upon terms, which can protect you if a payment dispute arises
- CRA audit readiness: the CRA can request supporting documents at any point within a six-year window, and your invoices are one of the first things they'll look at
For a broader look at managing your tax obligations as a self-employed worker in Canada, see this guide to freelance taxes.
Download free freelance invoice templates
Starting from scratch every time you invoice a client wastes time you could spend on billable work. A template gives you a ready-made structure with all the fields you need.
You can download a free freelance invoice template that's formatted for Canadian freelancers. If you'd prefer a more general layout you can customize, browse the full invoice template library for additional options.
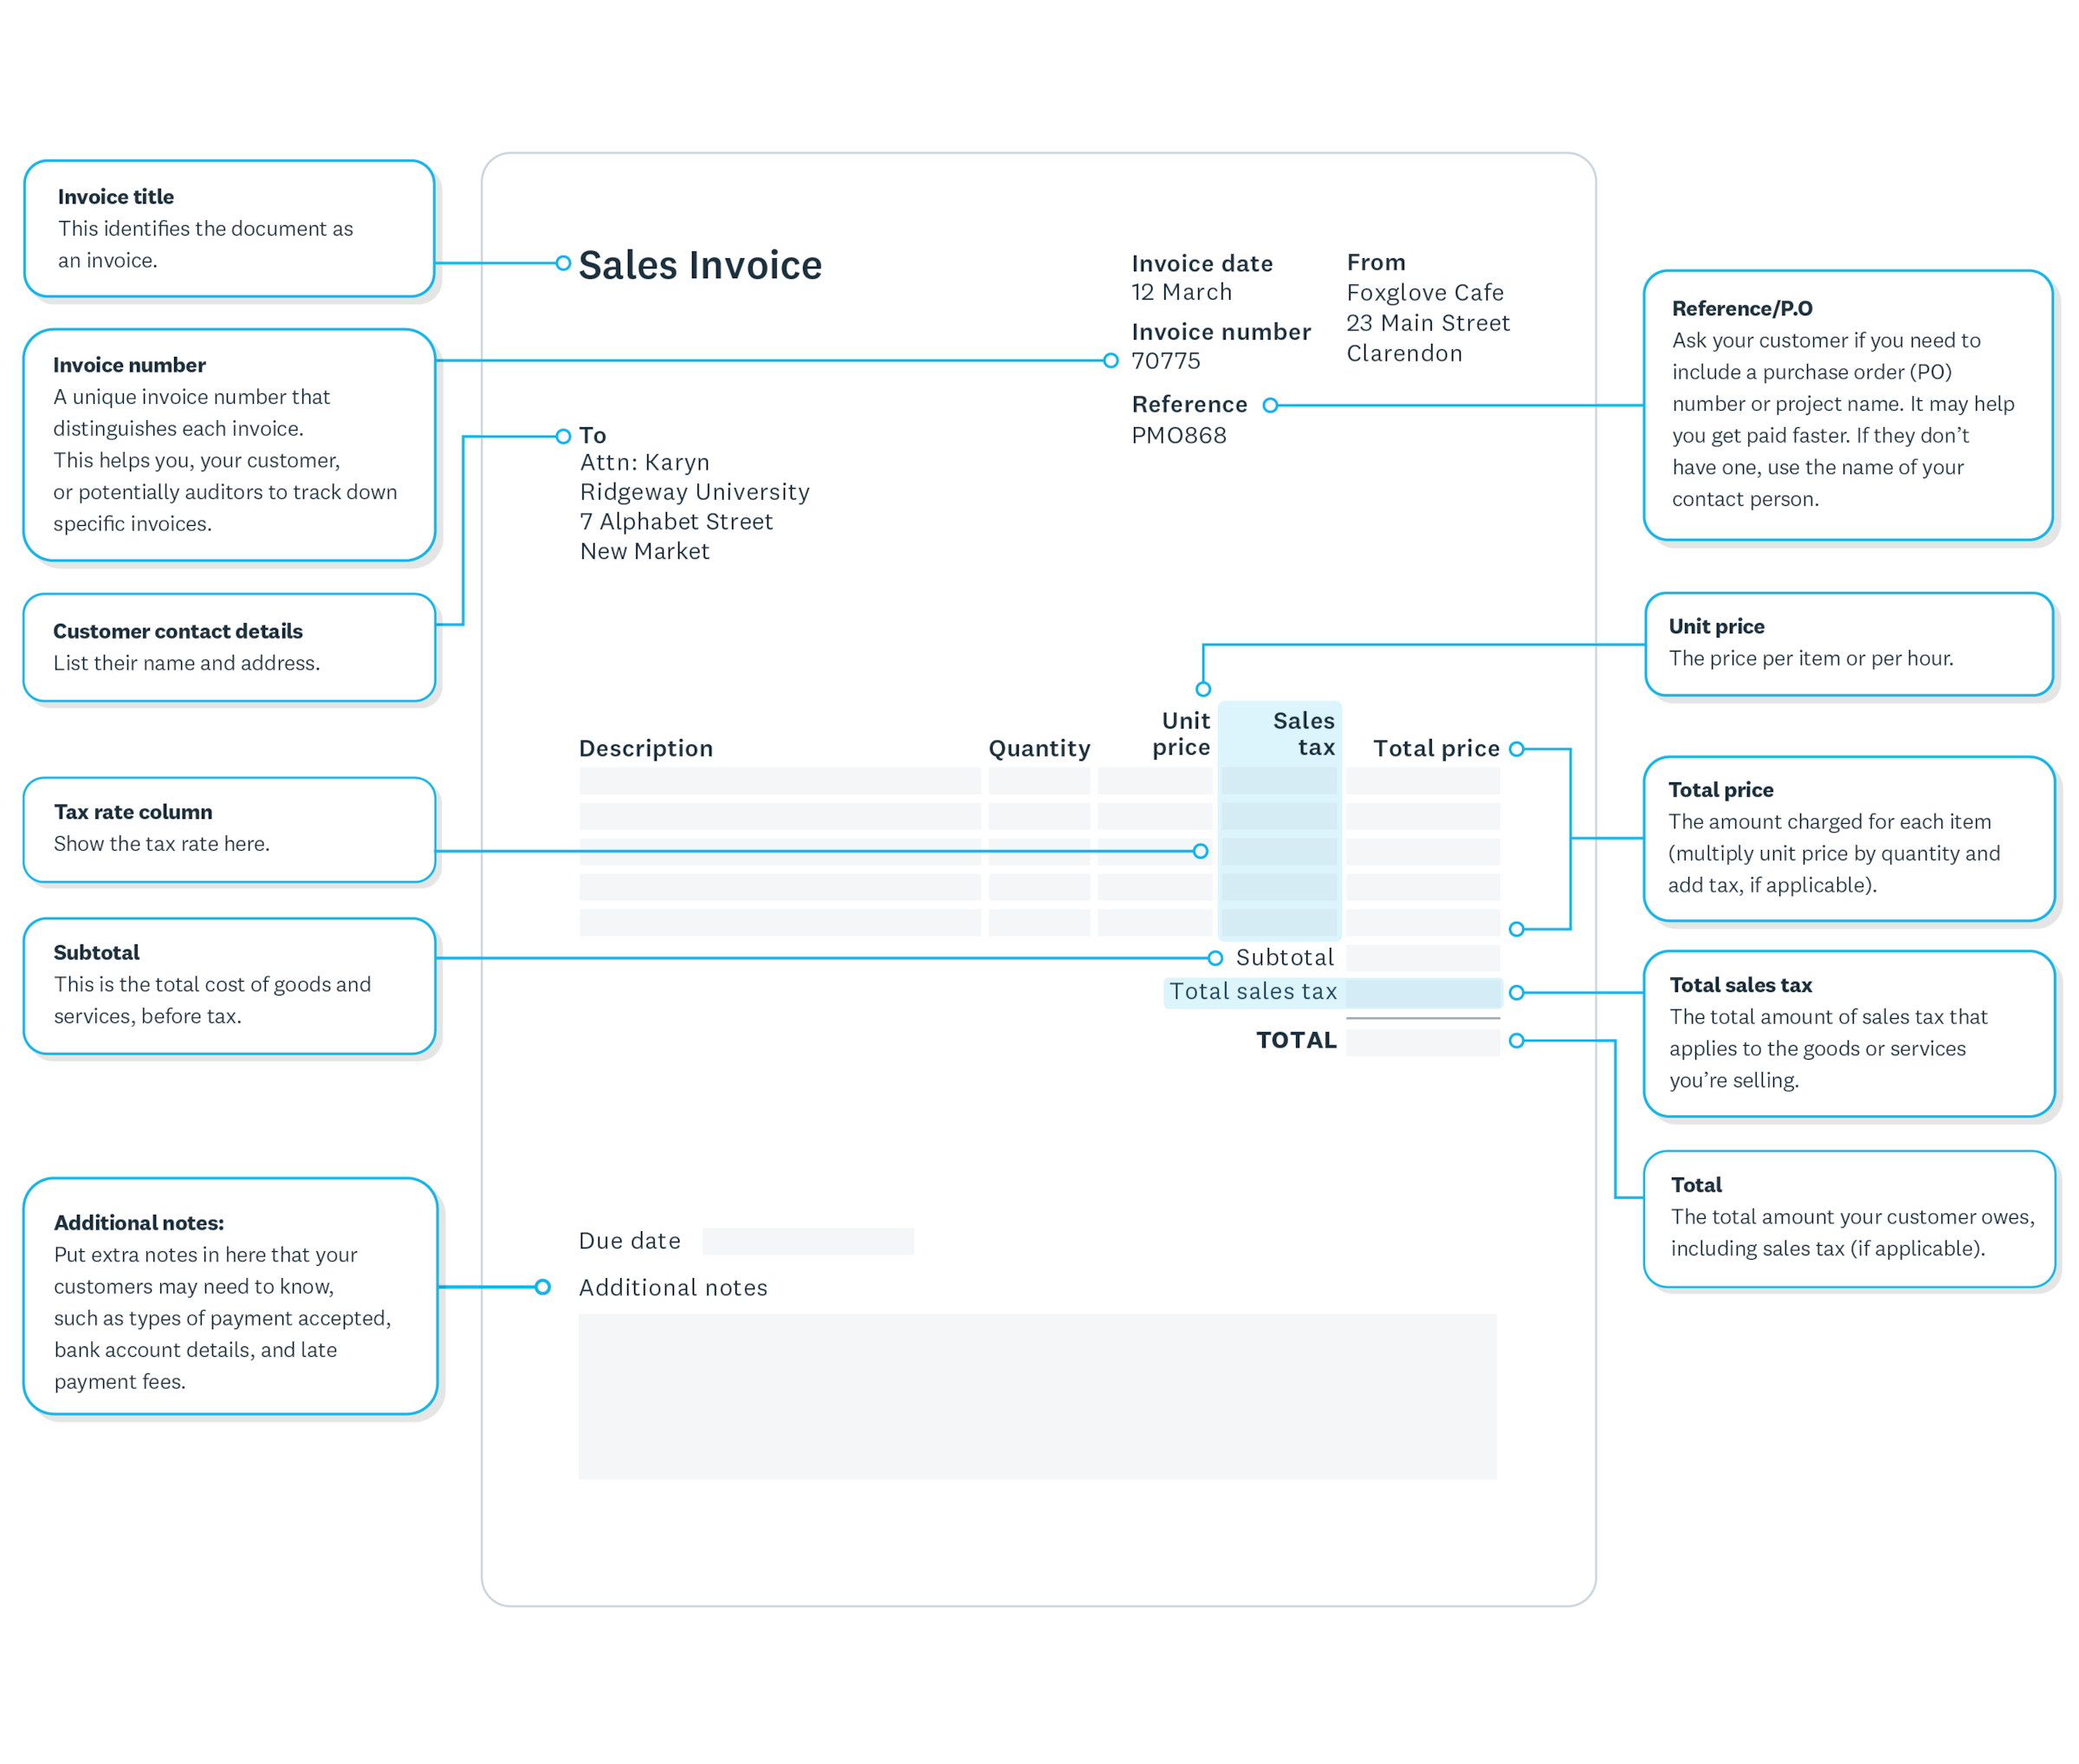
What to include on your freelance invoice
A complete freelance invoice includes several key elements that protect both you and your client. Missing even one of these items can delay payment or create confusion down the line.
Here are the essential items on a freelance invoice:
Your business and contact details
Include your full name or business name, address, phone number, and email at the top. If you've registered for GST/HST, add your business number here too. This makes it easy for the client's accounts team to process your invoice and reach you with questions.
Client details
List the client's full business name, contact person, and billing address. Matching these details to what the client has on file avoids processing delays, especially with larger companies that route invoices through an accounts payable department.
Invoice number
Assign a unique invoice number to every invoice you send. A sequential numbering system (for example, INV-001, INV-002) keeps your records organized and makes it simple to reference a specific invoice later. The CRA also expects your financial records to be orderly and traceable.
Invoice date and due date
Include the date you're issuing the invoice and the date payment is due. Common terms in Canada include Net 15 or Net 30, meaning payment is expected within 15 or 30 days. Being specific about the due date removes ambiguity and gives you a clear basis for follow-up if payment is late.
Description of services
Provide a clear, itemized breakdown of the work you completed. Each line item should describe the service, the quantity or hours, and the rate. For example, "Website copywriting: 5 pages at $150 per page." The more specific you are, the fewer questions your client will have.
Subtotal, taxes, and total
Show the subtotal for all services, then list any applicable taxes separately. In Canada, this typically means GST (5%) and, depending on your province, HST or provincial sales tax (PST). Display the final total prominently so it's the first number your client sees.
Payment terms and methods
Spell out how you'd like to be paid and any conditions. Include accepted payment methods (for example, bank transfer, credit card, or online payment), your late payment policy, and any early payment discounts. Clear terms set expectations from the start.
How to create your freelance invoice
Creating a freelance invoice doesn't need to be complicated. Follow these 10 steps to build an invoice that's professional, complete, and ready to send.
1. Choose your invoicing method
Decide whether you'll use invoicing software, a spreadsheet, or a template. Invoicing software automates much of the process and reduces errors. If you're just starting out, a free template works well while you build your client base. For a step-by-step walkthrough, see this guide on how to make an invoice.
2. Add your business information
Enter your full legal name or registered business name, address, email, phone number, and GST/HST number (if applicable). If you have a logo, include it for a polished, branded look.
3. Add your client's details
Fill in the client's business name, contact person, and billing address. Double-check spelling and confirm the billing address matches what the client provided, especially for corporate clients with multiple offices.
4. Assign a unique invoice number
Use a consistent numbering format across all your invoices. This keeps your records tidy and helps both you and your client locate a specific invoice quickly.
5. Include the invoice date and due date
Set the invoice date to the day you're sending it. Choose a due date that aligns with the payment terms you've agreed on with your client. If you haven't discussed terms, Net 30 is the most common standard in Canada.
6. List each service with a description
Break the work into individual line items. Include the service name, a brief description, the quantity or hours, and the rate per unit. Clarity here saves you from follow-up emails asking what a charge covers.
7. Add quantities and rates
For each line item, multiply the quantity by the rate to calculate the line total. If you worked 12 hours at $75 per hour, the line total is $900. Show the math clearly.
8. Calculate taxes
If you're registered for GST/HST, calculate the appropriate tax on the subtotal. The rate depends on your province. List each tax on a separate line so the client can see exactly what's being charged.
9. Show the total amount due
Add up all line items and taxes to display the final amount. Make this number stand out visually on the invoice so there's no confusion about what the client owes.
10. Include payment instructions
Tell the client exactly how to pay you. If you accept bank transfers, include your bank details. If you accept online payments, provide a payment link. The fewer steps between receiving the invoice and paying it, the faster you'll get your money.
How to invoice for different billing types
Not every freelance project is billed the same way. How you structure your invoice depends on the type of arrangement you have with your client. Here are the three most common billing types and how to handle each one.
Project-based invoicing
With a flat project fee, your invoice lists the project name, a description of deliverables, and the total agreed price. If you've broken the project into milestones, you can invoice at each milestone rather than waiting until the end. For example, "Phase 1: brand strategy document, $2,500." This approach keeps cash flow steady during longer projects.
Hourly invoicing
When billing by the hour, include a detailed log of hours worked alongside each line item. List the date, task description, hours, and hourly rate. For example, "April 15: social media content writing, 3 hours at $85/hour, $255." A clear time log reduces client pushback and builds trust over time.
Retainer invoicing
A retainer is a recurring agreement where the client pays a fixed amount each billing period for an agreed scope of work. Your invoice should reference the retainer agreement, state the billing period (for example, "May 2025 retainer"), and list the fixed fee. If the agreement includes provisions for additional hours beyond the retainer, itemize those separately on the same invoice.
Set clear invoice terms
Your payment terms define when and how you expect to be paid. Clear terms reduce late payments and set professional boundaries from the start of every client relationship.
Consider including the following in your invoice terms:
- Payment deadline: Net 15 and Net 30 are standard in Canada. Shorter terms like Net 15 can improve your cash flow, especially when you're working with new clients
- Accepted payment methods: list every option, such as bank transfer, credit card, or online payment. The more options you offer, the easier it is for the client to pay promptly
- Late payment fees: a common approach is 1.5% to 2% per month on the overdue balance. Including this on every invoice, even if you rarely enforce it, encourages on-time payment
- Deposit requirements: for large projects, requesting 25% to 50% upfront protects you from non-payment and shows the client is committed
- Currency: always specify the currency (for example, CAD) to avoid confusion with international clients
Put your terms in writing before you start any project. Including them on every invoice reinforces the agreement and gives you something to point to if a payment is late.
How to send your freelance invoice
How you deliver your invoice matters almost as much as what's on it. The method you choose can affect how fast you get paid and whether the invoice gets lost in a client's inbox.
Here are the most common ways to send a freelance invoice:
- Email: the most popular option for Canadian freelancers. Attach the invoice as a PDF and include a brief, professional note in the body of the email with the invoice number, amount, and due date
- Invoicing software: send directly from your invoicing tool. This often includes a built-in payment link, automated reminders, and delivery tracking so you know when the client has viewed the invoice
- Client portals: some larger clients require you to submit invoices through their own system. Always confirm the process during onboarding to avoid delays
Whichever method you use, send your invoice as soon as the work is complete (or at the agreed billing interval). Delays in sending lead to delays in getting paid. For more tips on delivery, check out this guide on how to send an invoice.
Get paid faster
The average Canadian invoice takes about 30 days to get paid. That's a long time to wait for money you've already earned, and 71% of freelancers experience late payments at some point. The good news is there are practical steps you can take to shorten that cycle.
Here are proven ways to speed up payment:
- Offer online payments: invoices with a "pay now" button get paid up to twice as fast as those without one. Clients can settle the bill in a few clicks instead of arranging a bank transfer. Learn more about Tap to Pay and other options for accepting payments
- Send invoices immediately: the sooner you invoice, the sooner the clock starts on your payment terms. Waiting even a few days pushes your pay date further out
- Use clear payment terms: as covered above, specific due dates and instructions reduce friction
- Automate reminders: set up automatic emails that nudge clients a few days before the due date and again if the invoice becomes overdue
- Offer early payment discounts: a small discount (for example, 2% off if paid within 10 days) can motivate clients to prioritize your invoice
Follow up on overdue invoices
Even with clear terms and professional invoices, late payments happen. Having a structured follow-up process keeps the relationship professional while protecting your cash flow.
Here's a step-by-step escalation framework you can follow:
- 1 to 3 days overdue: send a friendly reminder. Keep the tone light and assume it was an oversight. Reference the invoice number, amount, and original due date. A simple "Just checking in on invoice #INV-042, which was due on May 1" is usually enough
- 2 weeks overdue: send a firmer follow-up. Restate the amount and due date, and ask when you can expect payment. If your terms include late fees, mention that they'll apply if the balance isn't settled soon
- 30+ days overdue: escalate. Send a formal written notice stating the overdue amount, accumulated late fees, and a final deadline. If the client still doesn't respond, consider pausing any ongoing work until the balance is cleared
Keep records of every follow-up you send. If you ever need to take further action, that documentation matters. For more detailed strategies, see this guide to chasing outstanding invoices.
5 best practices for freelance invoicing
Strong invoicing habits save you time, reduce payment delays, and keep your finances in order. These five practices cover the essentials every Canadian freelancer should follow.
- Invoice promptly and consistently: send your invoice as soon as the work is done or at the same time each billing cycle. Consistency trains your clients to expect and budget for your invoices
- Keep detailed records: store copies of every invoice, receipt, and contract for at least six years to meet CRA requirements. Digital copies backed up to the cloud are easier to organize and search than paper files
- Separate business and personal finances: open a dedicated business bank account. This makes it simpler to track income, claim expenses, and prepare your tax return
- Review your rates regularly: as your experience and skills grow, your rates should too. Review your pricing at least once a year and adjust your invoice templates accordingly
- Communicate proactively: if a project scope changes, discuss the impact on pricing before you do the extra work. Adding unexpected charges to an invoice strains the client relationship and can delay payment
If you're new to working for yourself, this guide on how to start freelancing covers the broader picture of setting up your business.
Make invoicing easier with Xero
Creating, sending, and tracking freelance invoices doesn't have to eat into your billable hours. Xero's online invoicing software lets you build professional invoices from customizable templates, send them directly to clients, and accept online payments, all from one place.
You can set up automatic payment reminders so you don't need to chase overdue invoices manually. Real-time tracking shows you when a client has viewed your invoice, so you always know where things stand. And because Xero connects your invoicing with your bank feeds and accounting, your books stay up to date without extra data entry.
Ready to simplify your invoicing? Try Xero and get one month free.
FAQs on freelance invoicing
Here are answers to frequently asked questions about freelance invoicing in Canada.
What should a freelance invoice include?
A freelance invoice should include your name or business name, contact details, client details, a unique invoice number, invoice and due dates, an itemized list of services with rates, applicable taxes (such as GST/HST), the total amount due, and payment instructions. These elements help your client process the invoice quickly and give you a clear financial record.
Do freelancers need to charge GST/HST in Canada?
You're required to register for and charge GST/HST once your revenue exceeds $30,000 over four consecutive calendar quarters. Below that threshold, registration is optional. Once registered, you'll need to include your business number on every invoice and remit the collected tax to the CRA.
How long should I keep copies of my invoices?
The CRA requires you to keep business records, including invoices, for at least six years from the end of the tax year they relate to. Storing digital copies in cloud-based software makes it easy to retrieve them if you're ever audited.
What's the best way to follow up on a late invoice?
Start with a polite email reminder one to three days after the due date, referencing the invoice number and amount. If there's no response after two weeks, send a firmer follow-up. After 30 days, consider a formal written notice and pause any ongoing work until the balance is settled.
Can I charge late fees on overdue invoices in Canada?
Yes, you can charge late fees as long as the terms are stated on your invoice or in your contract before the work begins. A common rate is 1.5% to 2% per month on the outstanding balance. Making late fees visible on every invoice encourages clients to pay on time.
Do I need a business number to invoice in Canada?
You don't need a business number to send invoices as a freelancer in Canada. However, if your revenue exceeds $30,000 over four consecutive quarters, you must register for a GST/HST account with the CRA, which gives you a business number. Even below that threshold, registering can allow you to claim input tax credits on business expenses.
Disclaimer
Xero does not provide accounting, tax, business or legal advice. This guide has been provided for information purposes only. You should consult your own professional advisors for advice directly relating to your business or before taking action in relation to any of the content provided.
Start using Xero for free
Access Xero features for 30 days, then decide which plan best suits your business.